Creating & Managing Findings

Creating a Finding Manually

  1. Click New Finding in the Findings tab toolbar. (Requires Analyst role or higher.)
  2. The Create Finding modal opens with a form.
  3. Fill in the required and optional fields:
    • Title (required): A short, descriptive name for the issue.
    • Description (optional): Additional context about the finding, what was found, where, and why it’s a concern.
    • Severity (required, default: Medium): Select from Critical, High, Medium, Low, Info.
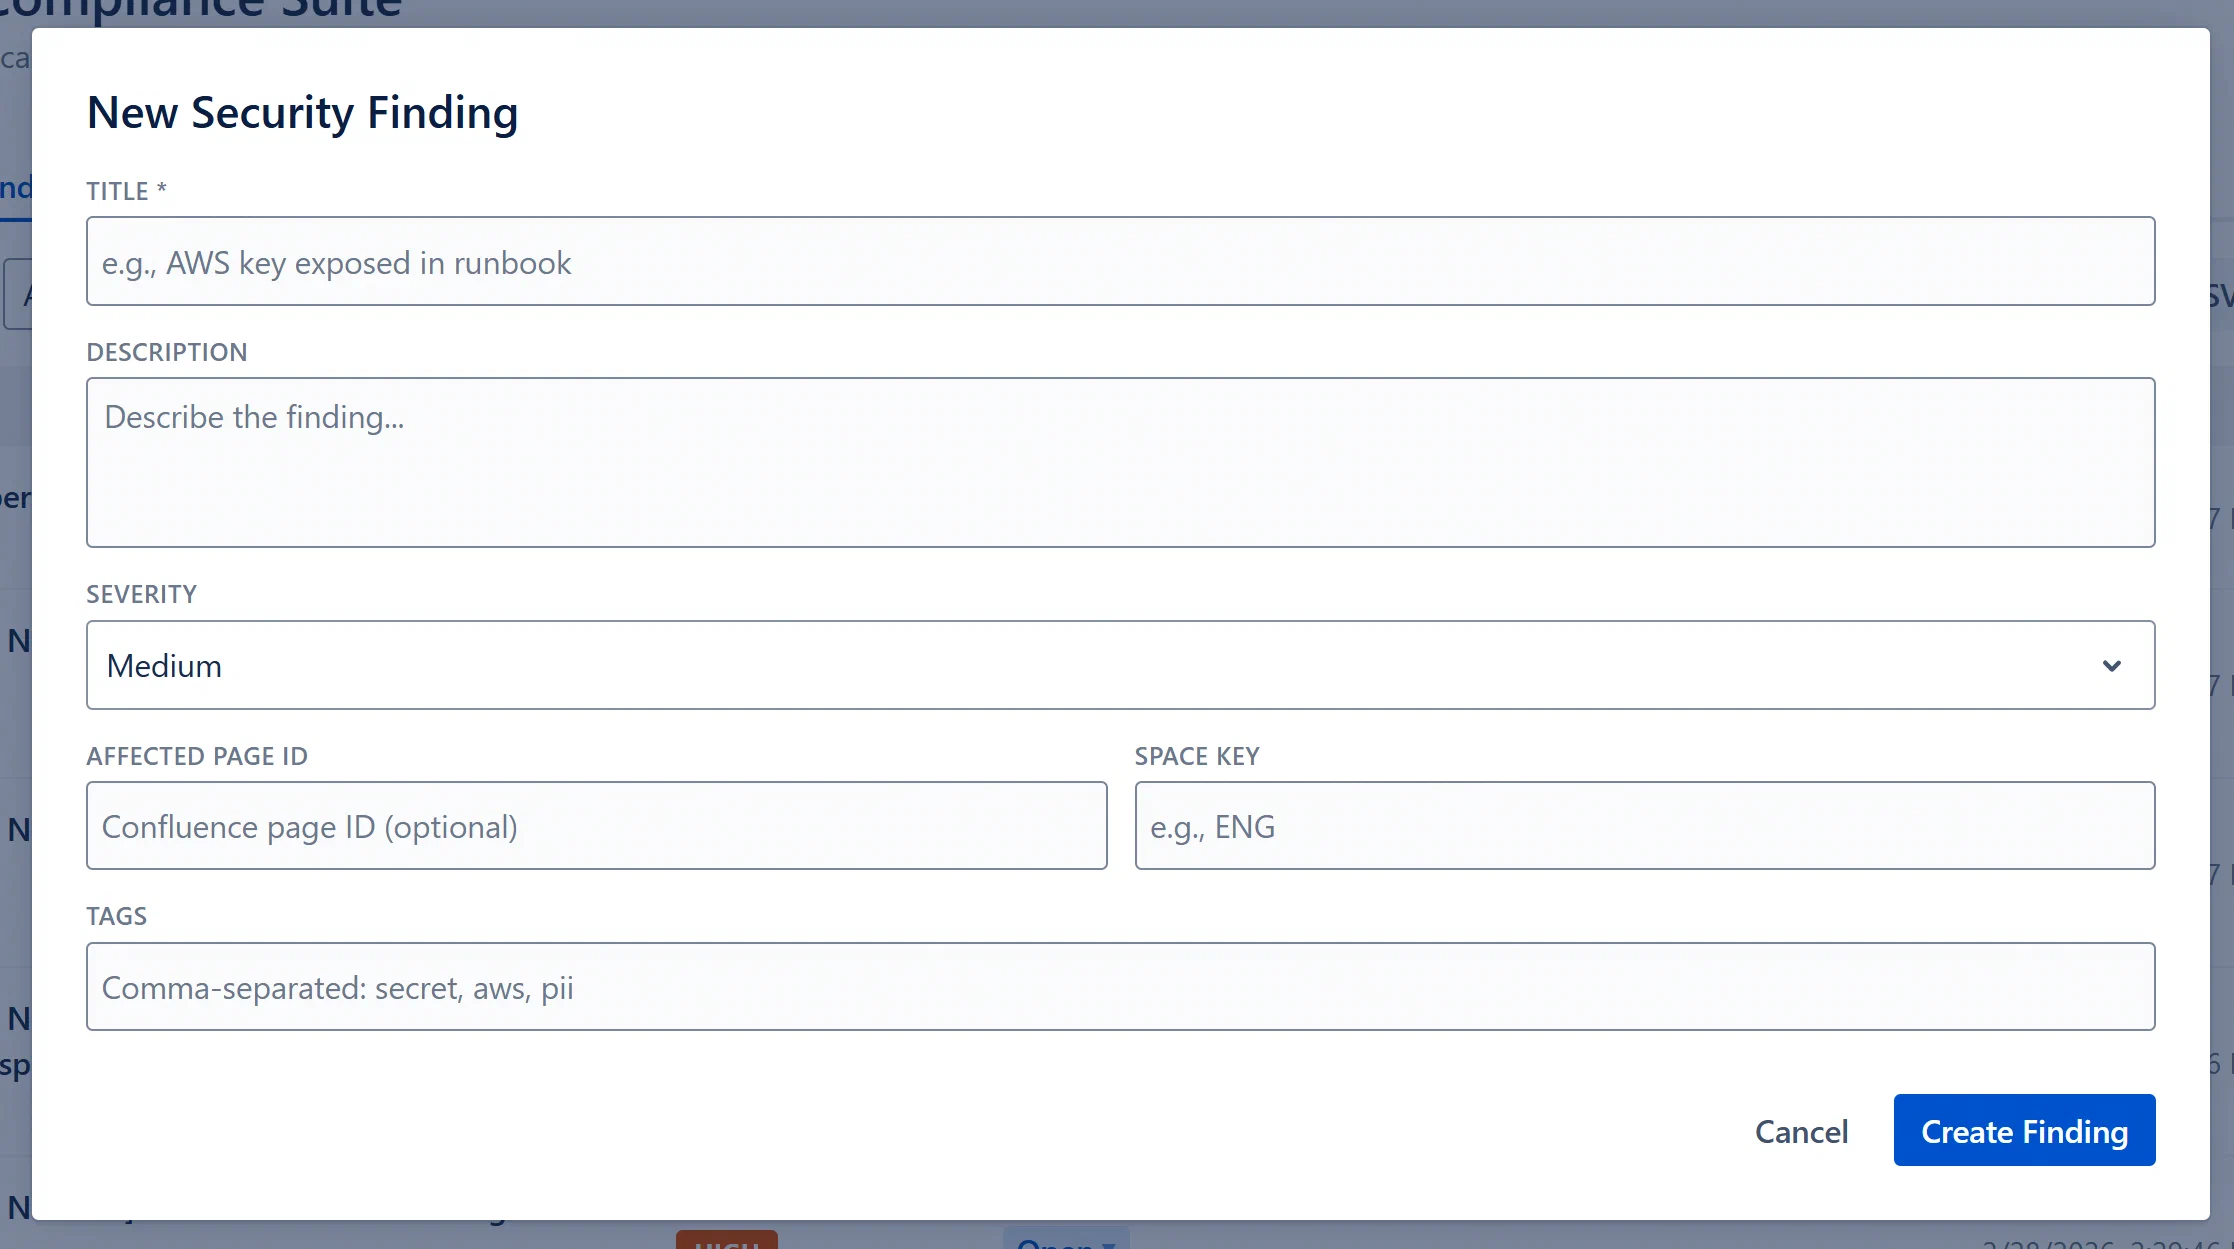
    • Affected Page ID (optional): The Confluence page ID of the page where the issue exists. If provided, links the finding to that page for exposure score calculation.
    • Affected Space Key (optional): The space key (e.g., “ENG”) if the finding is space-level rather than page-level.
    • Tags (optional): Comma-separated labels (e.g., “pii,gdpr,audit”).
  4. Click Create.
  5. The modal closes and the finding appears in the Findings table.

Create Finding modal, all fields visible, Severity dropdown open


Bulk CSV Import

CSV import allows you to bring in findings from spreadsheets or export files from other security tools.

CSV Format Requirements

The CSV must have a header row with the following column names (case-insensitive):

ColumnRequiredDescriptionExample
titleYesFinding titleAWS key in runbook
severityNo (defaults to medium)One of: critical, high, medium, low, infocritical
descriptionNoFree-text descriptionPlaintext AWS key found in ENG/Runbooks
affectedContentId (or contentid)NoConfluence page ID12345678
affectedSpaceKey (or spacekey)NoConfluence space keyENG
tagsNoComma-separated tags (wrap in quotes if using commas within the field)"secret,aws"

Example CSV:

title,severity,description,affectedSpaceKey,tags
AWS key in runbook,critical,Plaintext AWS key found,ENG,"secret,aws"
Password in config page,high,Admin password in plain text,INFRA,password

Import Procedure

  1. Click Import CSV in the Findings tab toolbar. (Requires Analyst role.)
  2. The Import Findings from CSV modal opens.
  3. Paste your CSV content (including the header row) into the text area.
  4. The modal shows a sample format hint above the text area:
    title,severity,description,affectedSpaceKey,tags
    AWS key in runbook,critical,Plaintext AWS key found,ENG,"secret,aws"
  5. Click Import.
  6. Aegis parses the CSV client-side to validate it, then sends the rows to the server.
  7. A success message shows: “Imported N of M findings.” If any rows had errors, the error count is shown.
  8. The modal closes after 1.5 seconds and the findings table reloads.

Duplicate Handling on CSV Import

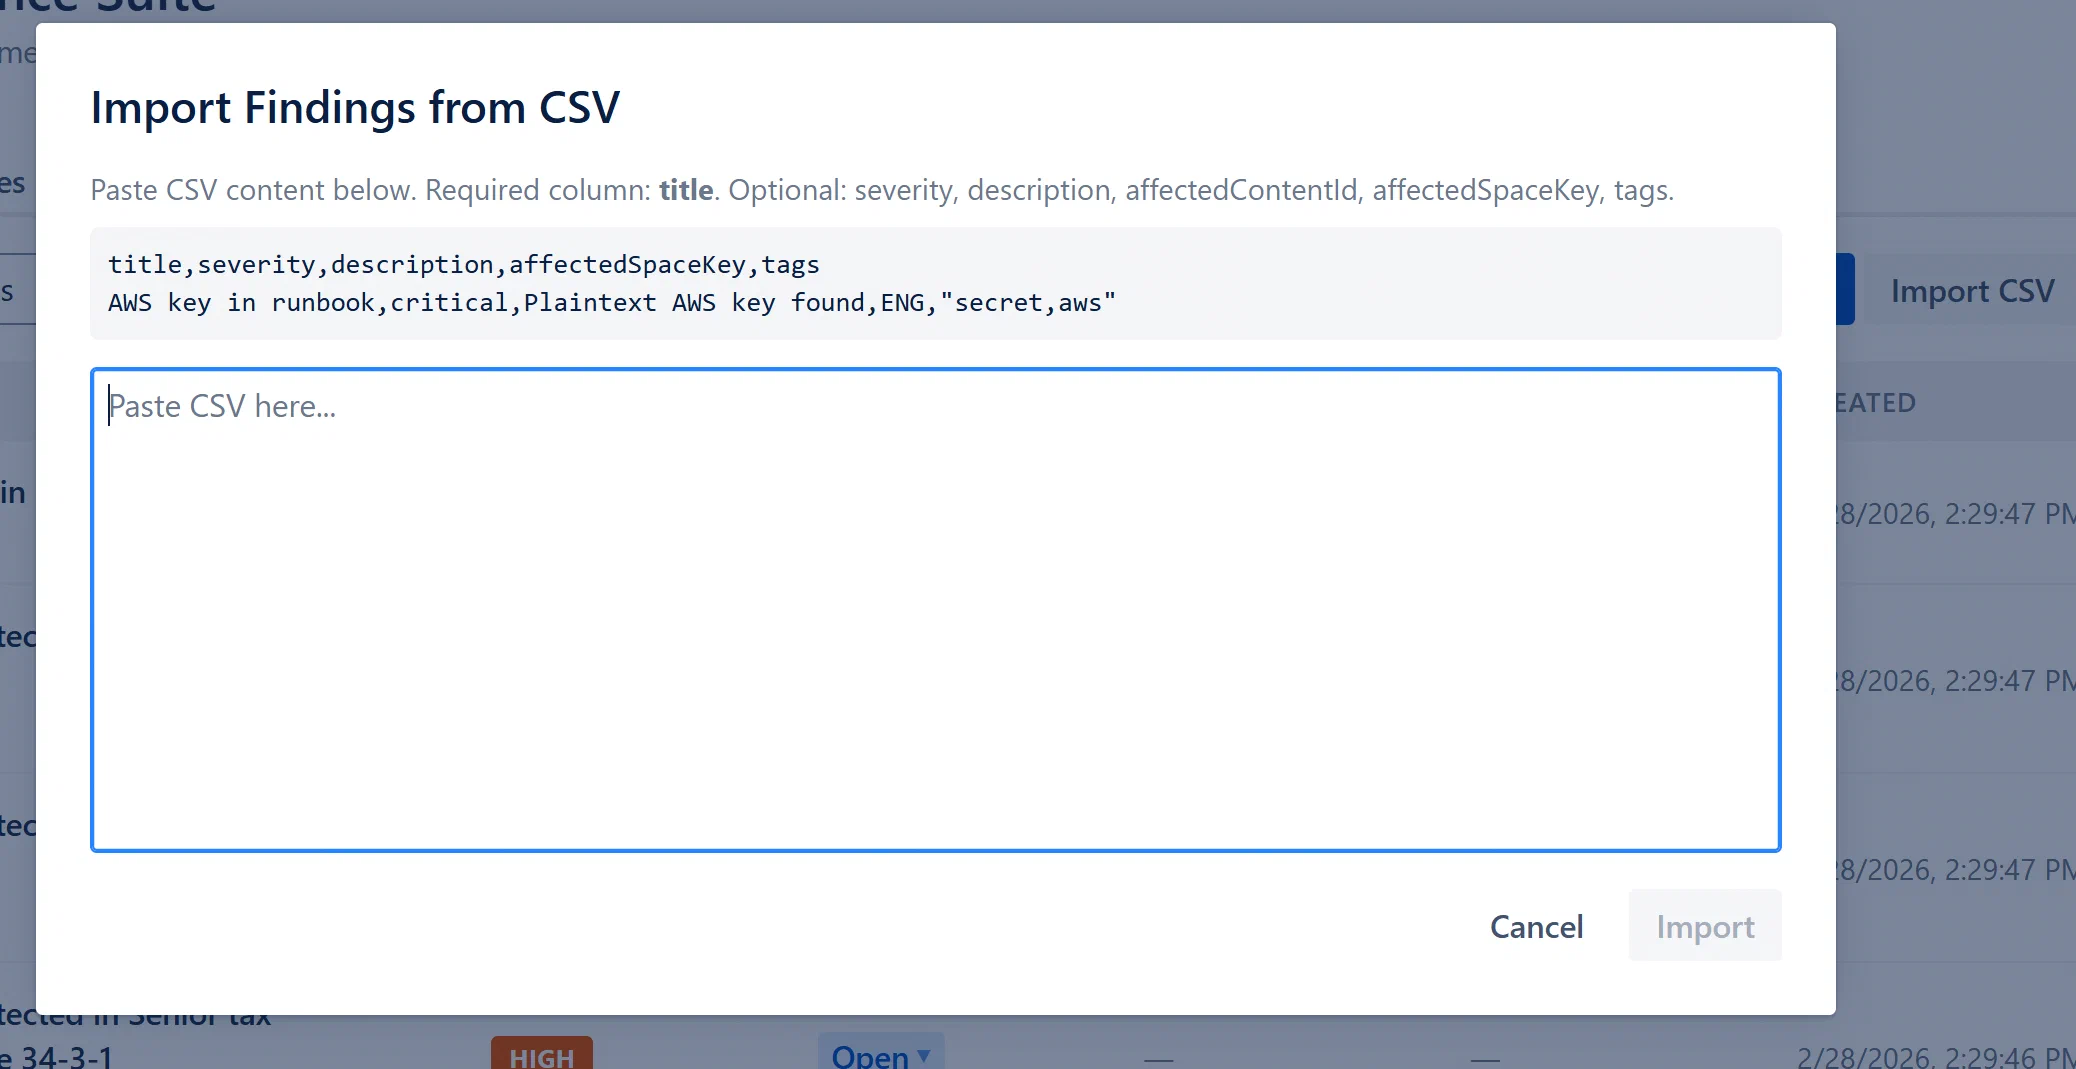
CSV import uses the same deduplication logic as the content scanner:

  • If a row’s title and page ID exactly match an existing Open or Triaged finding, the row is skipped (not counted as an error).
  • A row that fails field validation (e.g., invalid severity value) is counted as an error and skipped.

Warning: The CSV text area has no built-in character limit but the server enforces a maximum of 500 rows per import. Larger batches should be split into multiple 500-row files.

Import CSV modal, text area with sample CSV pasted, Import button


Changing Finding Status

From the Findings table (quick action, no modal required):

  1. Click the status badge in the Status column of any finding row. (Requires Analyst+ role.)
  2. A small dropdown appears with the available transitions.
  3. Click the desired new status. The change is saved immediately and the table refreshes.

Available quick transitions:

  • Open → Triage (sets status to Triaged)
  • Open → Dismiss (sets status to Dismissed)
  • Triaged → Resolve (sets status to Resolved)
  • Triaged → Dismiss (sets status to Dismissed)
  • Resolved → Reopen (sets status to Open)
  • Dismissed → Reopen (sets status to Open)

From the Finding Detail Modal (full control):

  1. Click the finding row to open the detail modal.
  2. Use the Status dropdown in the action bar.
  3. Select any status (all options except the current one are available).

What each transition means in practice:

  • Open → Triaged: “I have reviewed this finding. It is a real issue and I am tracking it for remediation.”
  • Open/Triaged → Resolved: “The issue has been fixed. If this is a scanner finding, the next scan will re-check the page.”
  • Open/Triaged → Dismissed: “This is not a real risk for our environment, or it is a known false positive. Do not surface this again.”
  • Resolved/Dismissed → Reopen: “I need to reactivate this finding. It was not fully fixed, or the dismissal was a mistake.”

Creating a Case from a Finding

Cases provide structured remediation workflows for findings that require coordinated effort. You should create a case when:

  • The finding requires investigation by multiple people.
  • You need to assign ownership and track progress against an SLA.
  • You want to request a formal risk exception if the issue cannot be fixed immediately.
  • You need an evidence trail for audit purposes.

Step by step:

  1. Click the finding to open the Finding Detail Modal.
  2. Click Create Case in the action bar. (Requires Analyst+ role.)
  3. A new case is created automatically with:
    • Title: “Case: [finding title]”
    • Severity: inherited from the finding
    • The finding is linked to the new case
  4. The “Create Case” button is replaced by a “Case Linked” badge and a “View Case →” link.
  5. Click “View Case →” to open the case detail modal and assign it, add comments, or set additional context.

Alternatively, from the Findings table you can select multiple findings using checkboxes and use the bulk “Create Case” action to create a single case linked to all selected findings.